
Make a Hanging Star Lampshade

I’m so excited to share this handmade craft tutorial with you! I’m going to show you how to make your very own gorgeous hanging star lampshade, a sweet handmade touch that’s perfect for a nursery, children’s bedroom, or playroom.
There’s something so magical about making your own nursery décor. Not only does it look beautiful, but it’s also a chance to get creative.
Handmade nursery decor is a special way to add your love and personal touch to your little one’s space. It’s made by you with love for them, nothing beats that!
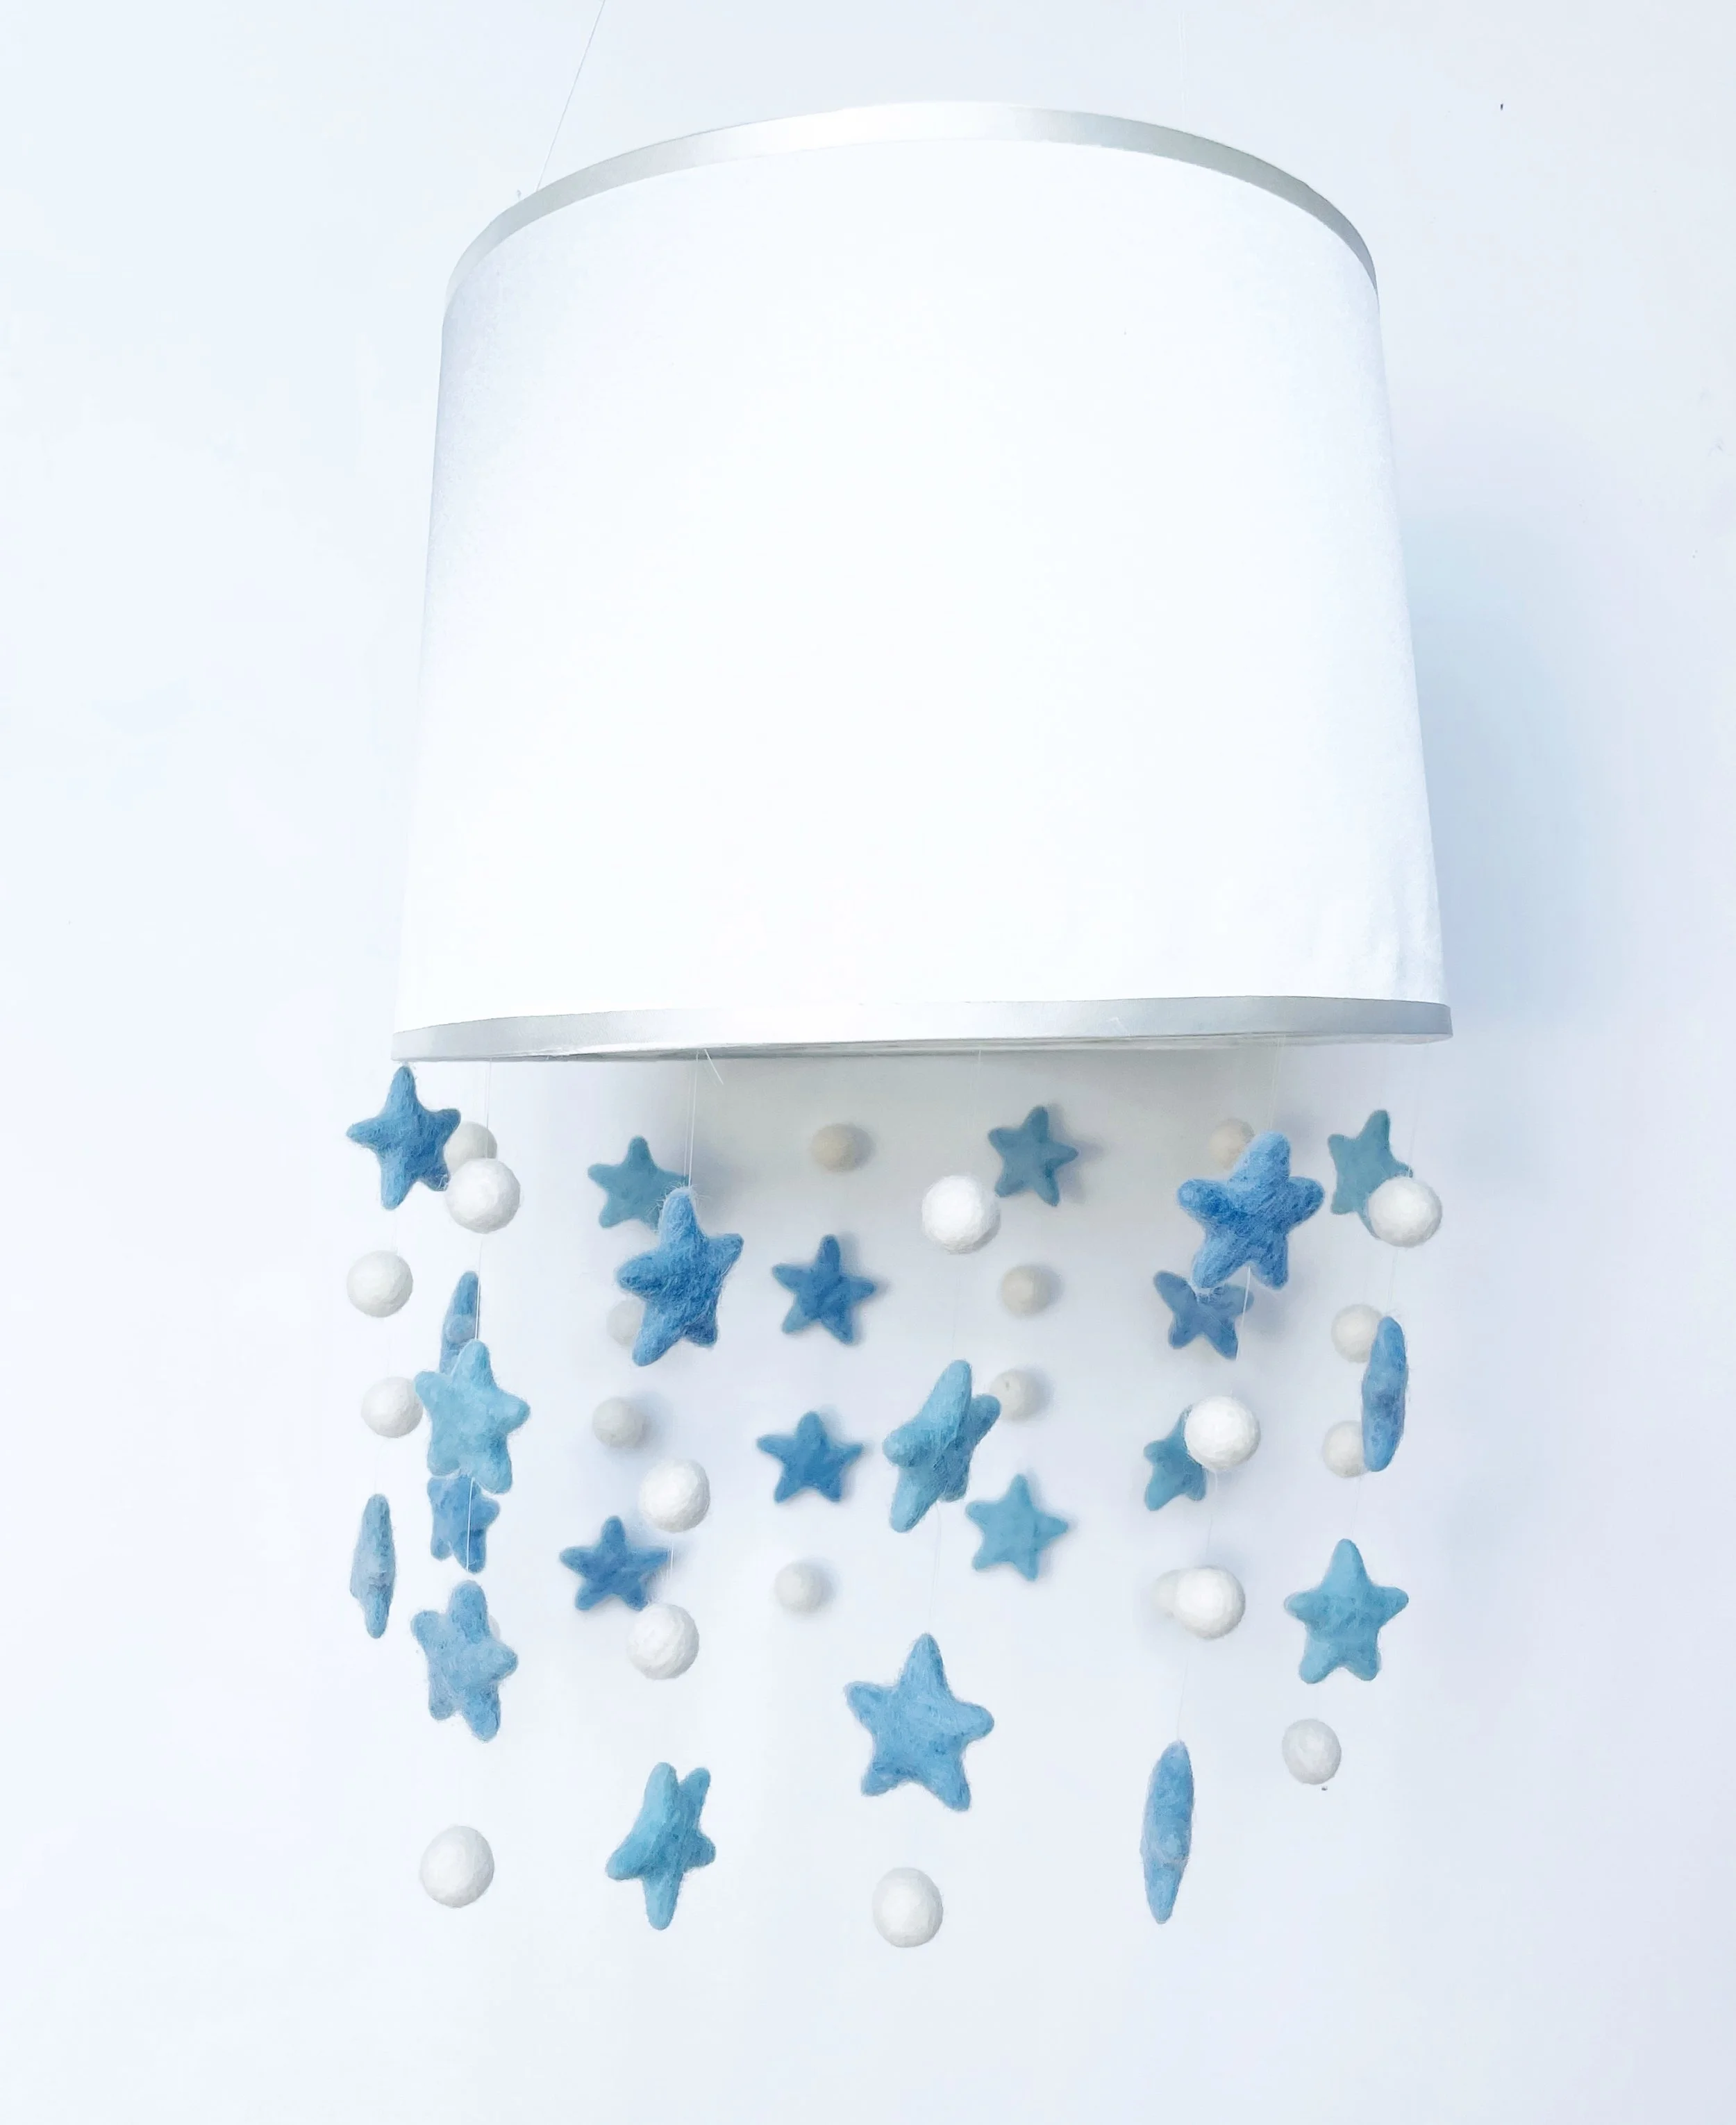
This dreamy lampshade is one of those projects that instantly transforms a space. The gentle sway of the felt stars and felt balls creates the softest, most calming movement, perfect for creating a soothing space for your little one.
What I love most about the hanging star lampshade is how versatile it is. Whether your style is modern, classic, or somewhere in between, you can tailor it to your taste.
I made mine with ivory felt balls, blue stars, and a white lampshade to suit the room I had in mind. But you could keep things neutral and minimalist, choose soft pastels, or even go bold with bright pops of colour.
The choice is completely yours.
And if you’re making this as a gift (what a lovely idea!), you can be sure it’ll look adorable in any child’s room, no matter the theme or colour scheme.
In this step-by-step guide, I’ll walk you through everything you need to know. By the time you hang your finished star lampshade, you’ll feel such a wonderful mix of joy and pride.
Take your time, there’s no need to rush. The process is part of the magic. Handmade projects really are little gifts for the soul.
A little tip before you start: give the tutorial a quick read-through once or twice. It helps everything feel more doable, especially if you’re new to crafting.
A word of warning… once you’ve made one, you’ll probably want to make more! They’re so fun (and just a bit addictive). Before you know it, you’ll be making them for every little one you know.
Selling your handmade crafts…
Nursery décor is always popular, parents love it, and it makes a heartfelt, meaningful gift. This hanging star lampshade could even be the perfect way to start (or grow) your handmade business.
If you’re selling, gender-neutral colours are a safe bet, but offering a mix of styles means there’s something for everyone. And here’s a tip to boost sales: pair your lampshade with a matching felt ball garland as a bundle.
Customers love a coordinated set, and it makes your listing irresistible. (If you’d like, you can check out my Felt Ball Garland tutorial for a perfect match!)
Flurraby Felt Ball Garland
You could even make a whole little set by creating coordinating felt ball curtain tie-backs, I’ve got a tutorial for those too if you’d like to give them a try! They look so sweet alongside the lampshade and garland.
And if you’re thinking about turning your handmade creations into a little business, don’t miss my Beginner’s Guide to Pricing Your Handmade Items. Pricing can feel a bit tricky at first, but don’t worry, I’ve broken it down in a way that’s simple and stress-free, so you’ll feel confident about putting the right value on your beautiful work.
What you need to make your own hanging star lampshade…
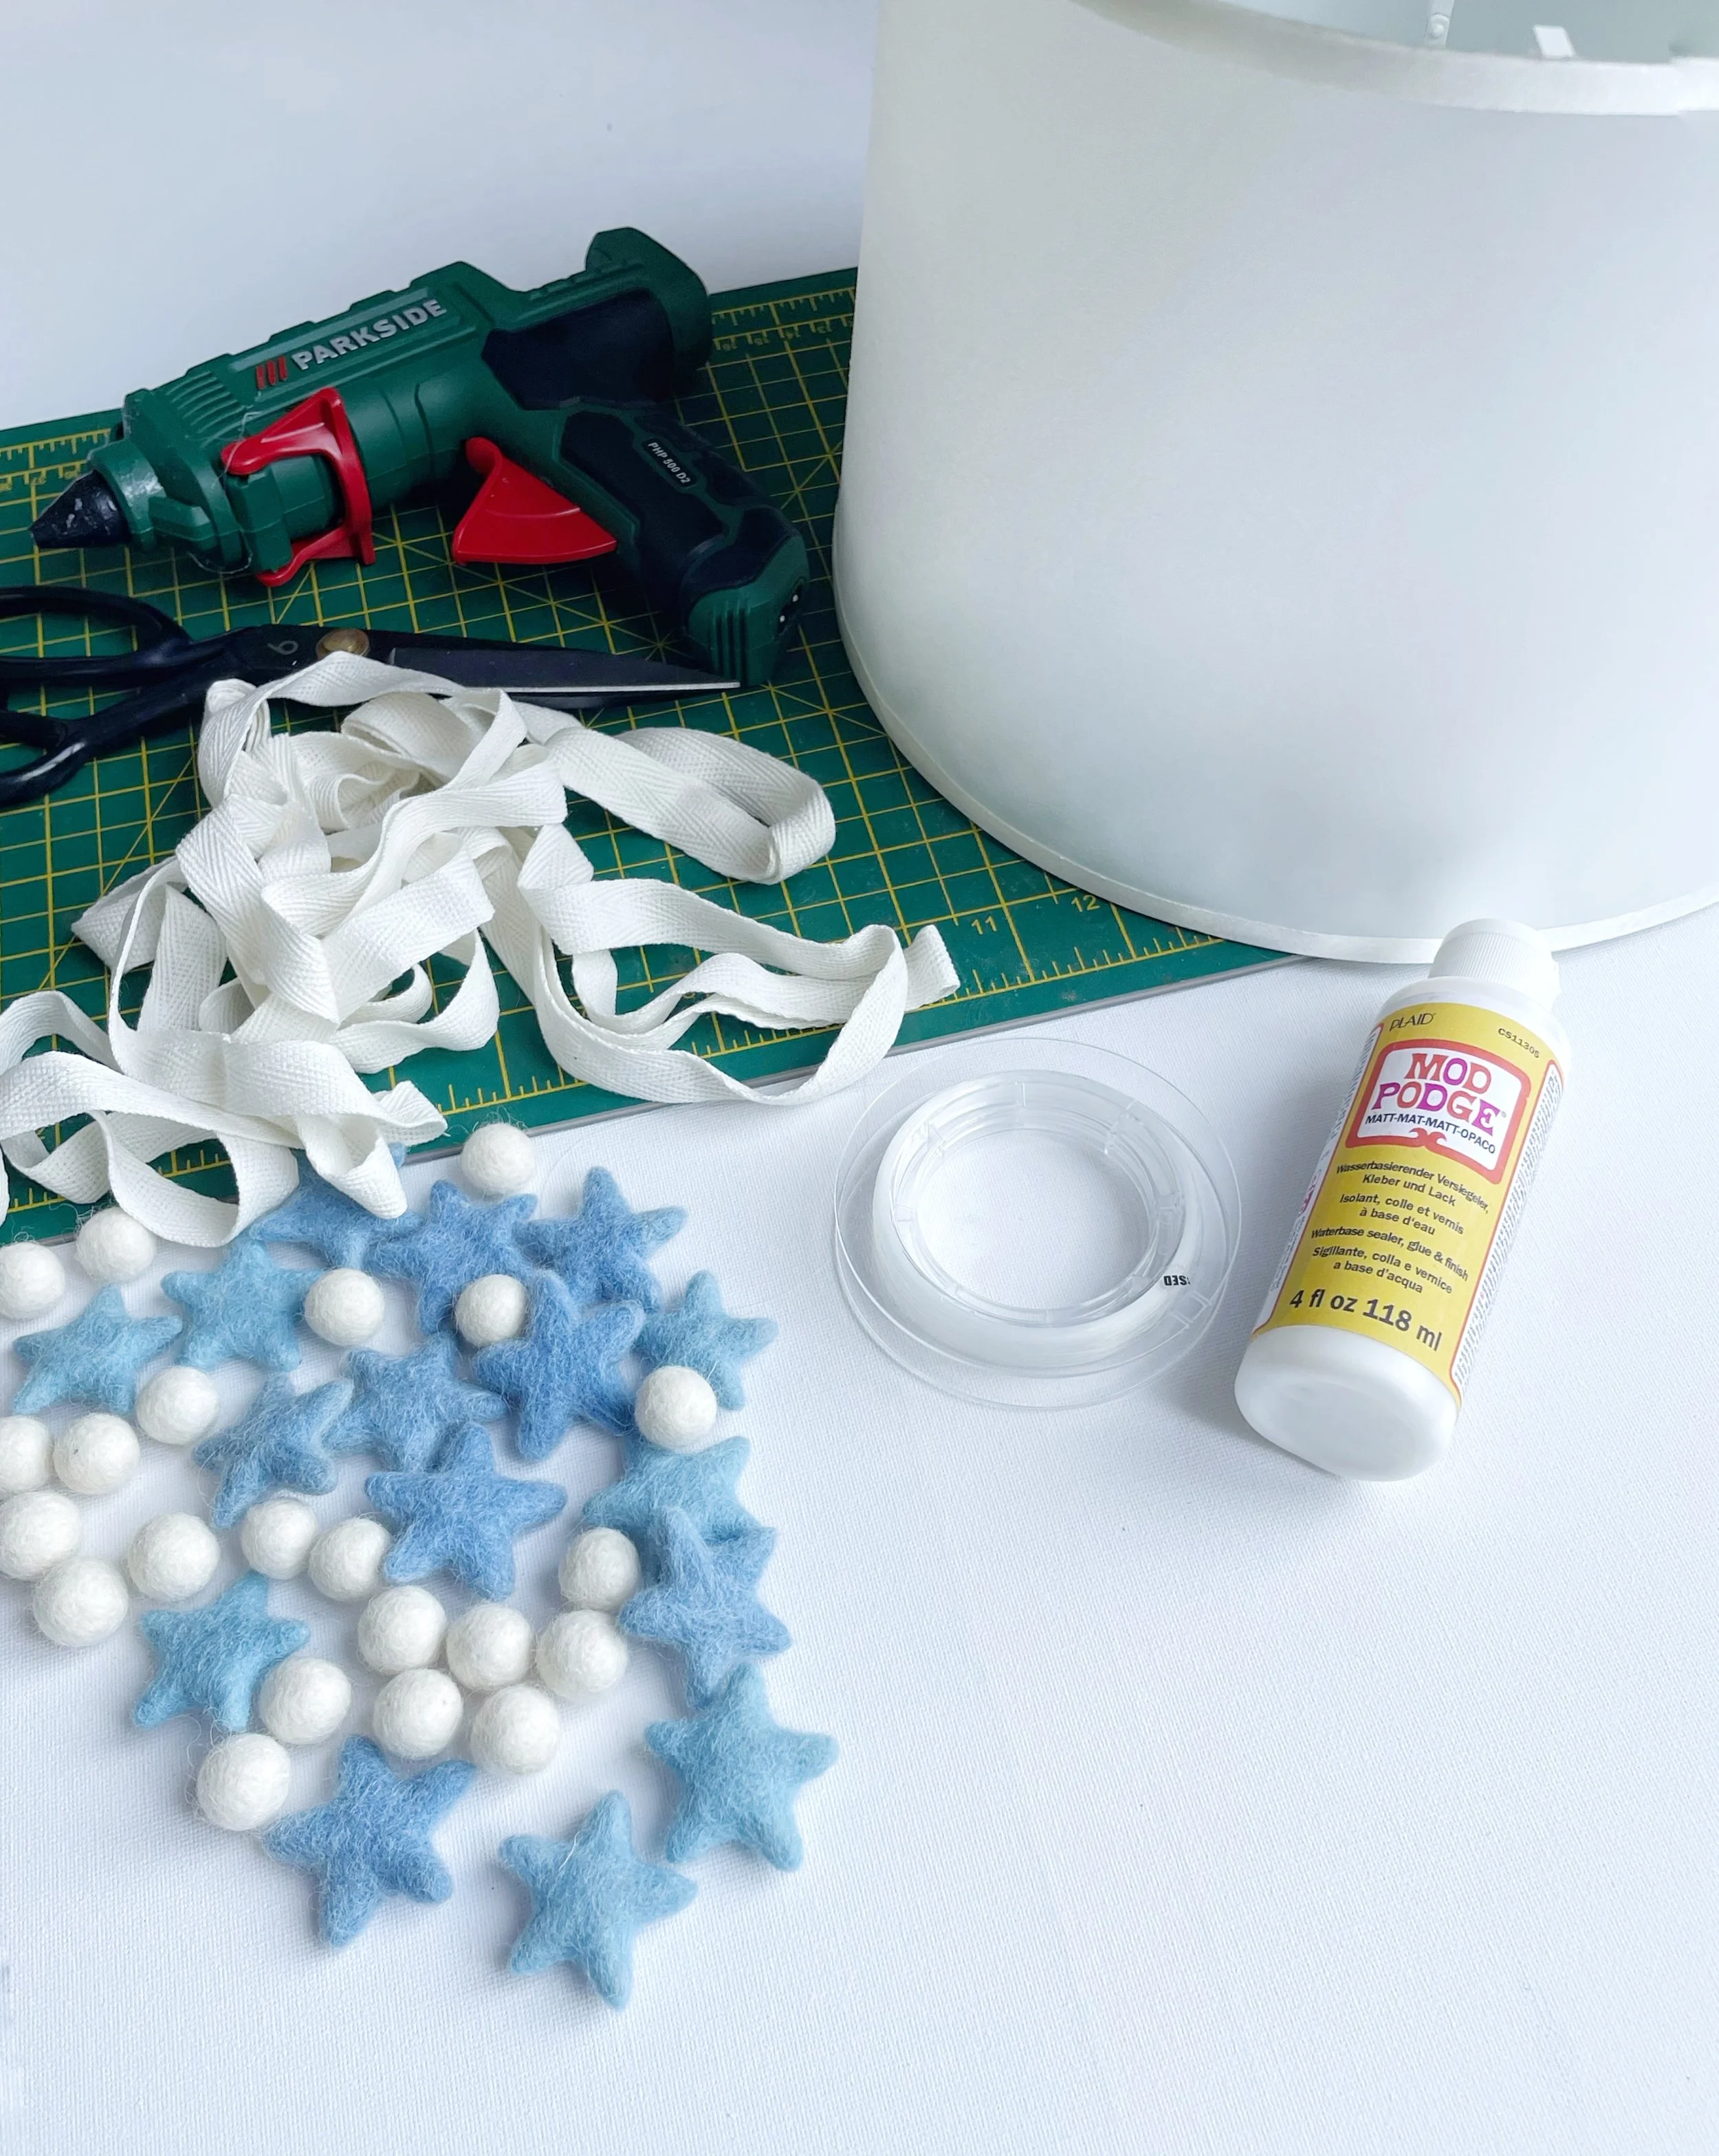
A lampshade in your chosen size and colour
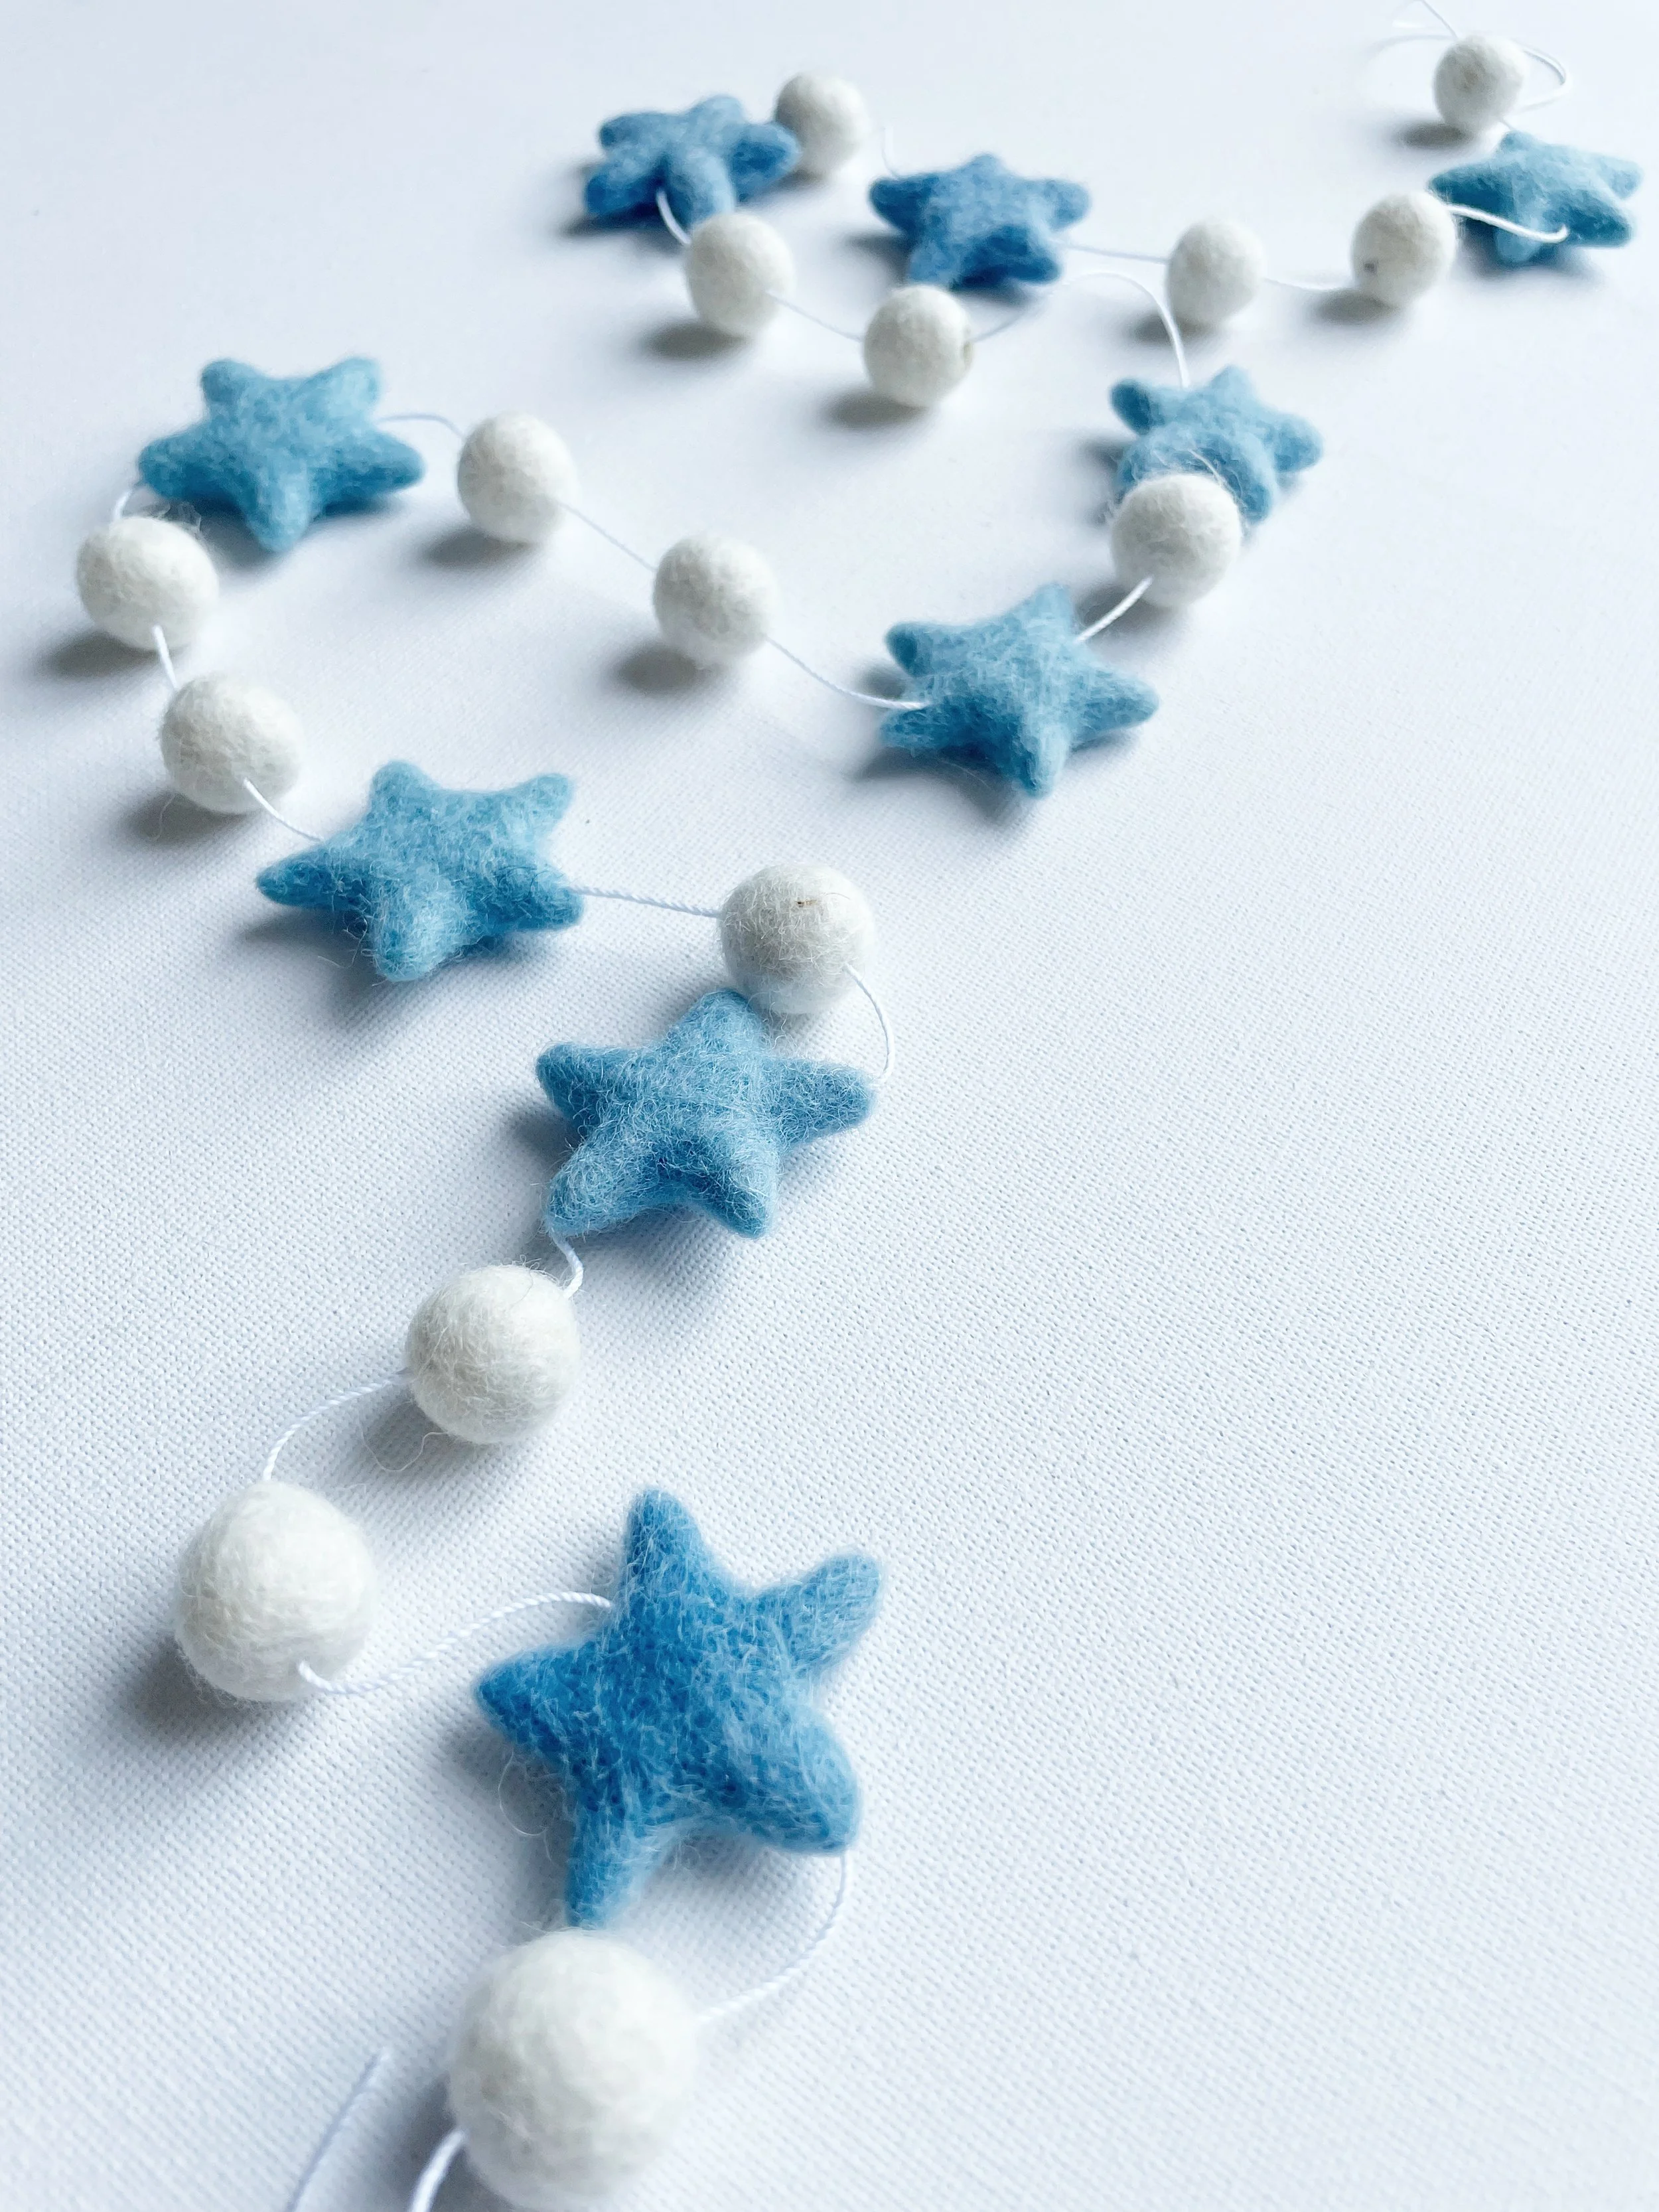
Felt balls and stars – the quantity will depend on the size of your lampshade and how many you would like on each individual thread.
For reference, the inside rim of my lampshade measures 35 Inches, I used approximately: 24 felt balls and 24 stars (2 of each on every thread).
I used 1.5 cm felt balls, as I think they look just right next to the stars.
Bias binding tape in a colour that matches your lampshade
Scissors
Invisible thread (or white cotton thread, if you prefer). Invisible thread gives a lovely “floating” effect, but it can be a little fiddly to work with because, well… it’s invisible! White cotton is easier to see and handle, so go with whatever feels right for you.
Sewing needle
A glue gun or fabric glue – I personally find a glue gun works best, but if you don’t have one and you’re only making a single lampshade, a strong fabric glue will do the trick.
Cutting mat – this makes it super easy to measure and space everything neatly, but if you don’t have one and don’t want to invest in one, a tape measure will work just fine too.
Masking Tape, Sellotape or similar - only a little is needed to temporarily hold the binding in place whilst measuring.
Measure the bias binding tape…
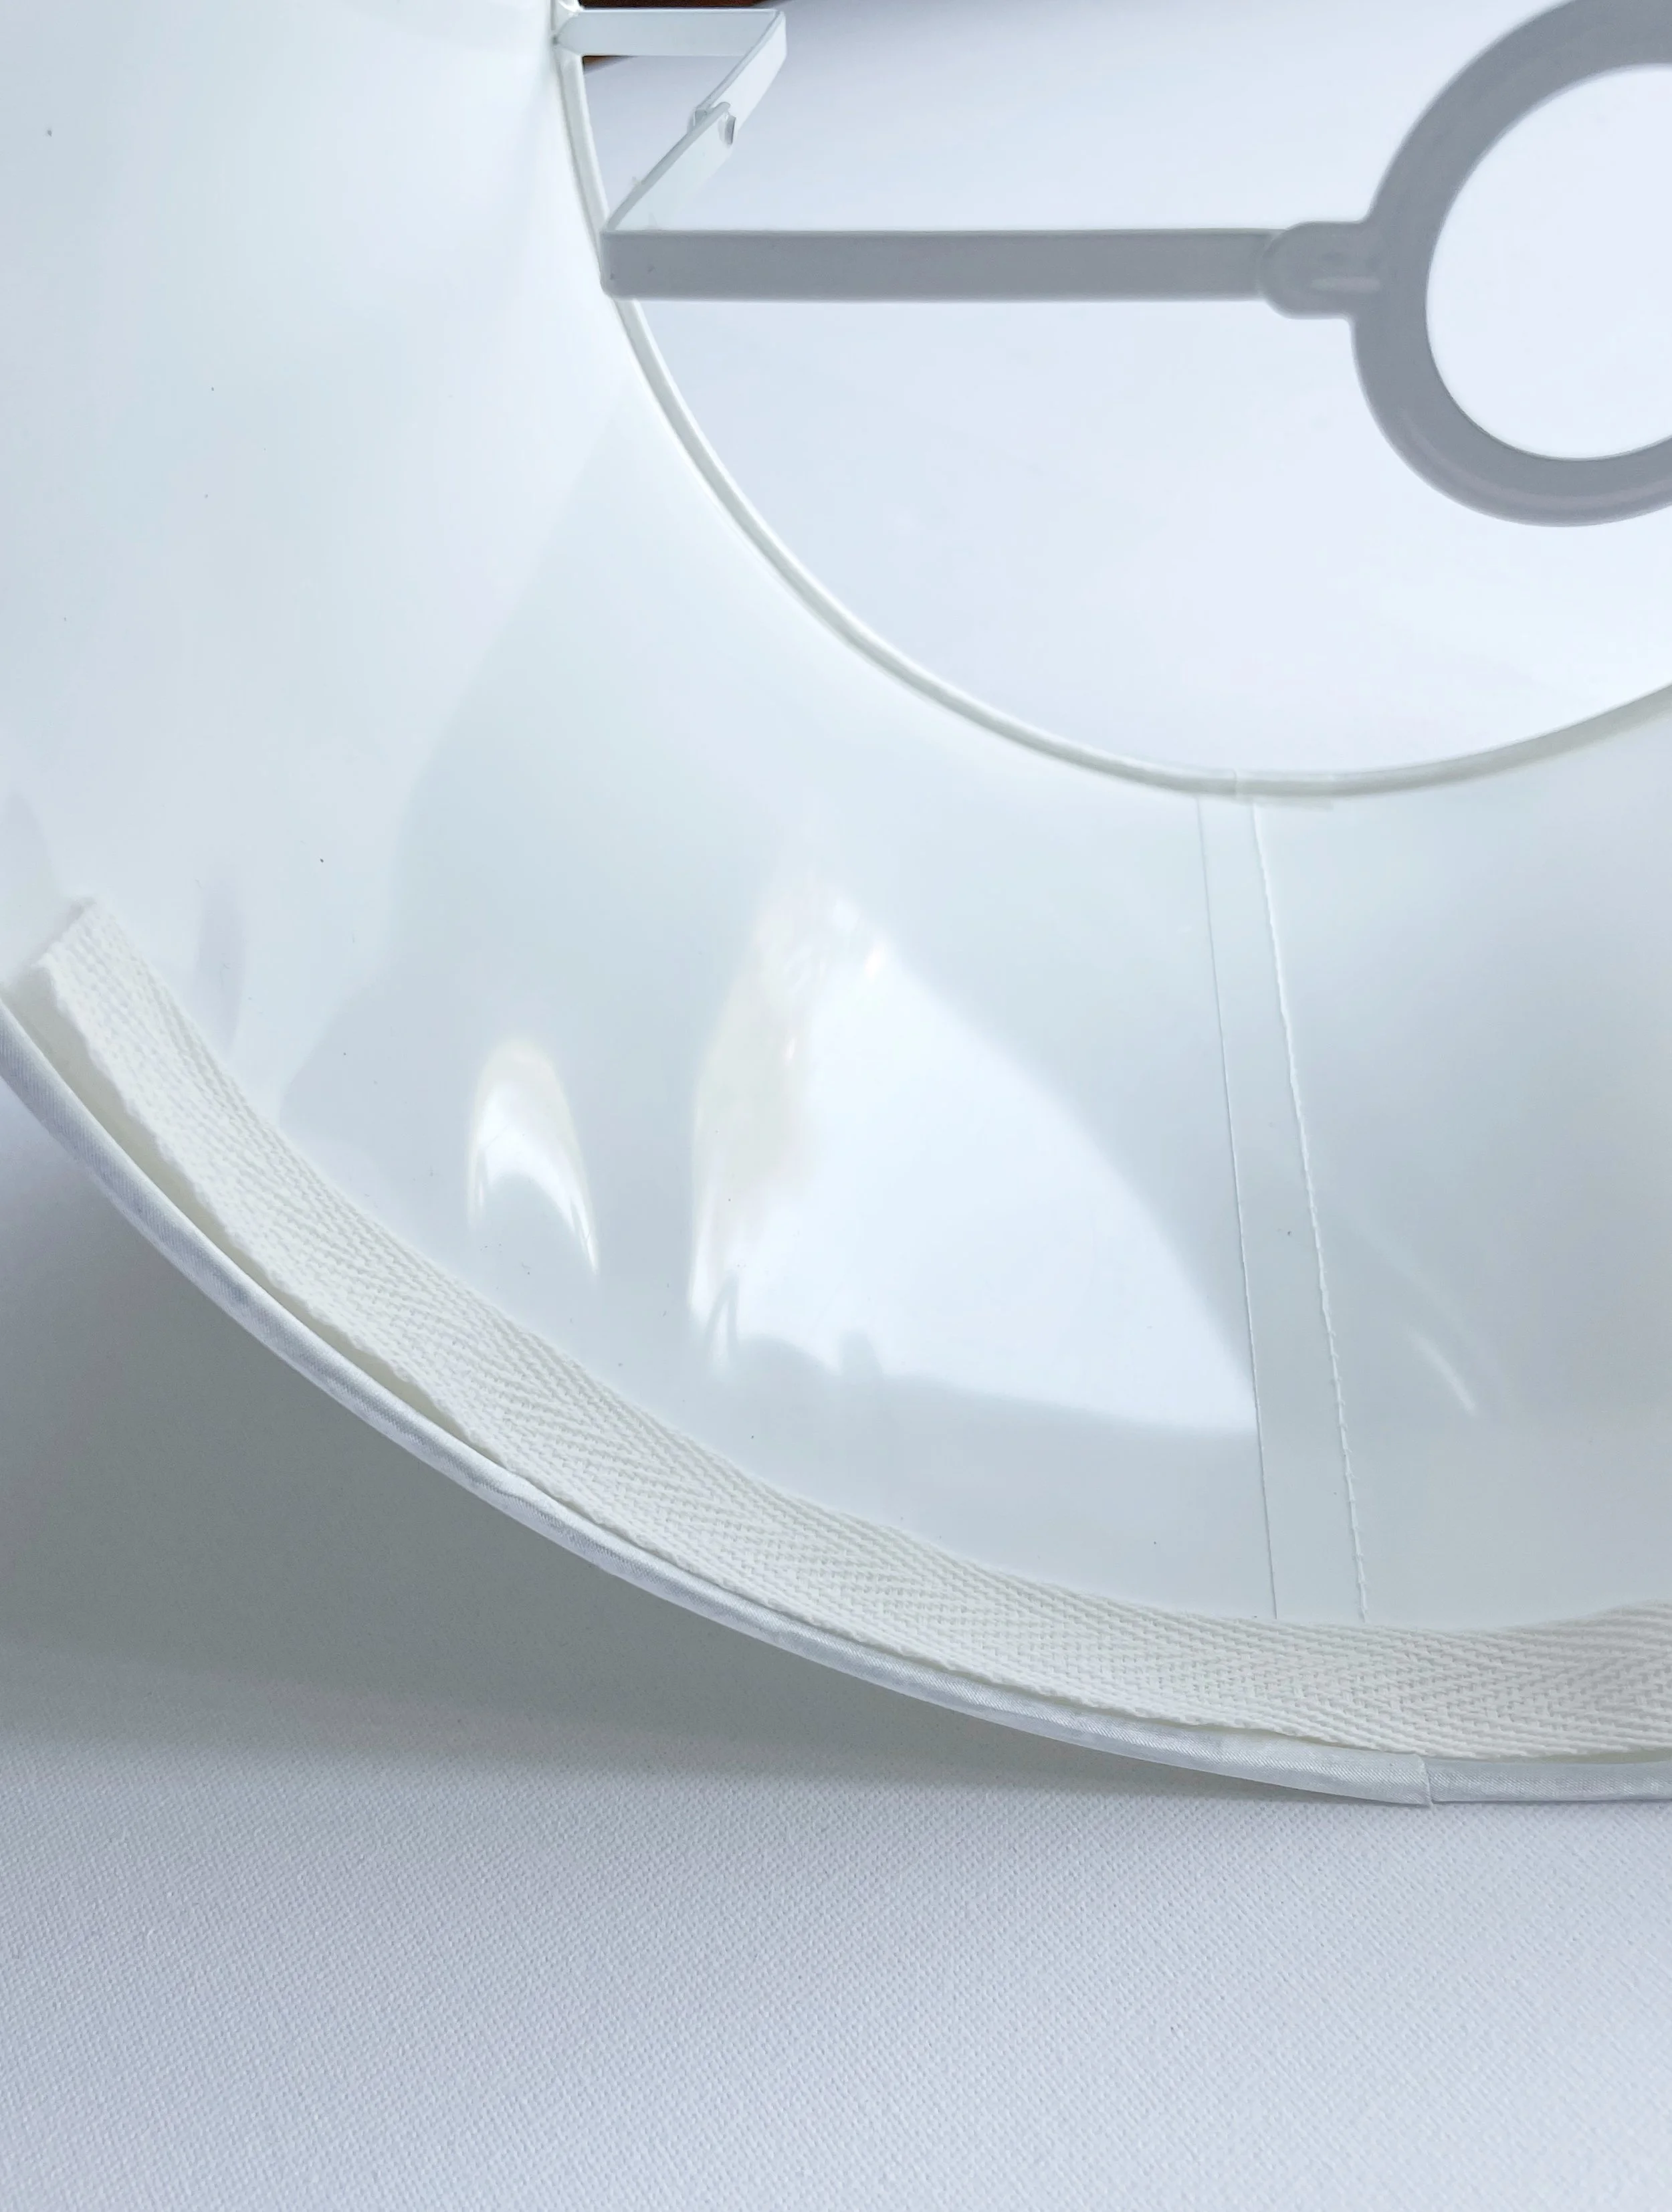
The first step is to measure out the length of bias binding tape you’ll need. You can do this in one of two ways:
Use a tape measure to measure around the inside base of your lampshade, then cut your binding to this size.
Or, skip the measuring tape and go straight in with the binding itself, tape one end to the inside of the lampshade base with a little masking tape or sellotape, then wrap it around until the ends meet and trim there.
Either way works perfectly, so just go with whichever feels easiest for you.
Next, decide how many strands of stars and felt balls you’d like to hang from your lampshade. Personally, I think spacing them about 2 inches apart looks nicest, it gives a lovely full effect without looking overcrowded.
To work this out, take the total measurement of your bias binding and divide it by the spacing you want between the strands.
For example:
If your binding measures 22 inches, and you’d like the strands 2 inches apart, simply divide 22 by 2:
22 ÷ 2 = 11 strands
✨ Handy tip: If your measurement doesn’t divide evenly (say you’re left with a half-inch extra or an odd number), don’t worry! Just spread the strands out ever so slightly, making a few gaps just over 2 inches. Once everything is hanging in place, you won’t notice the difference at all.
Add your stars and felt balls to the binding…
Now comes the really fun part, adding your felt balls and stars to each cotton strand!
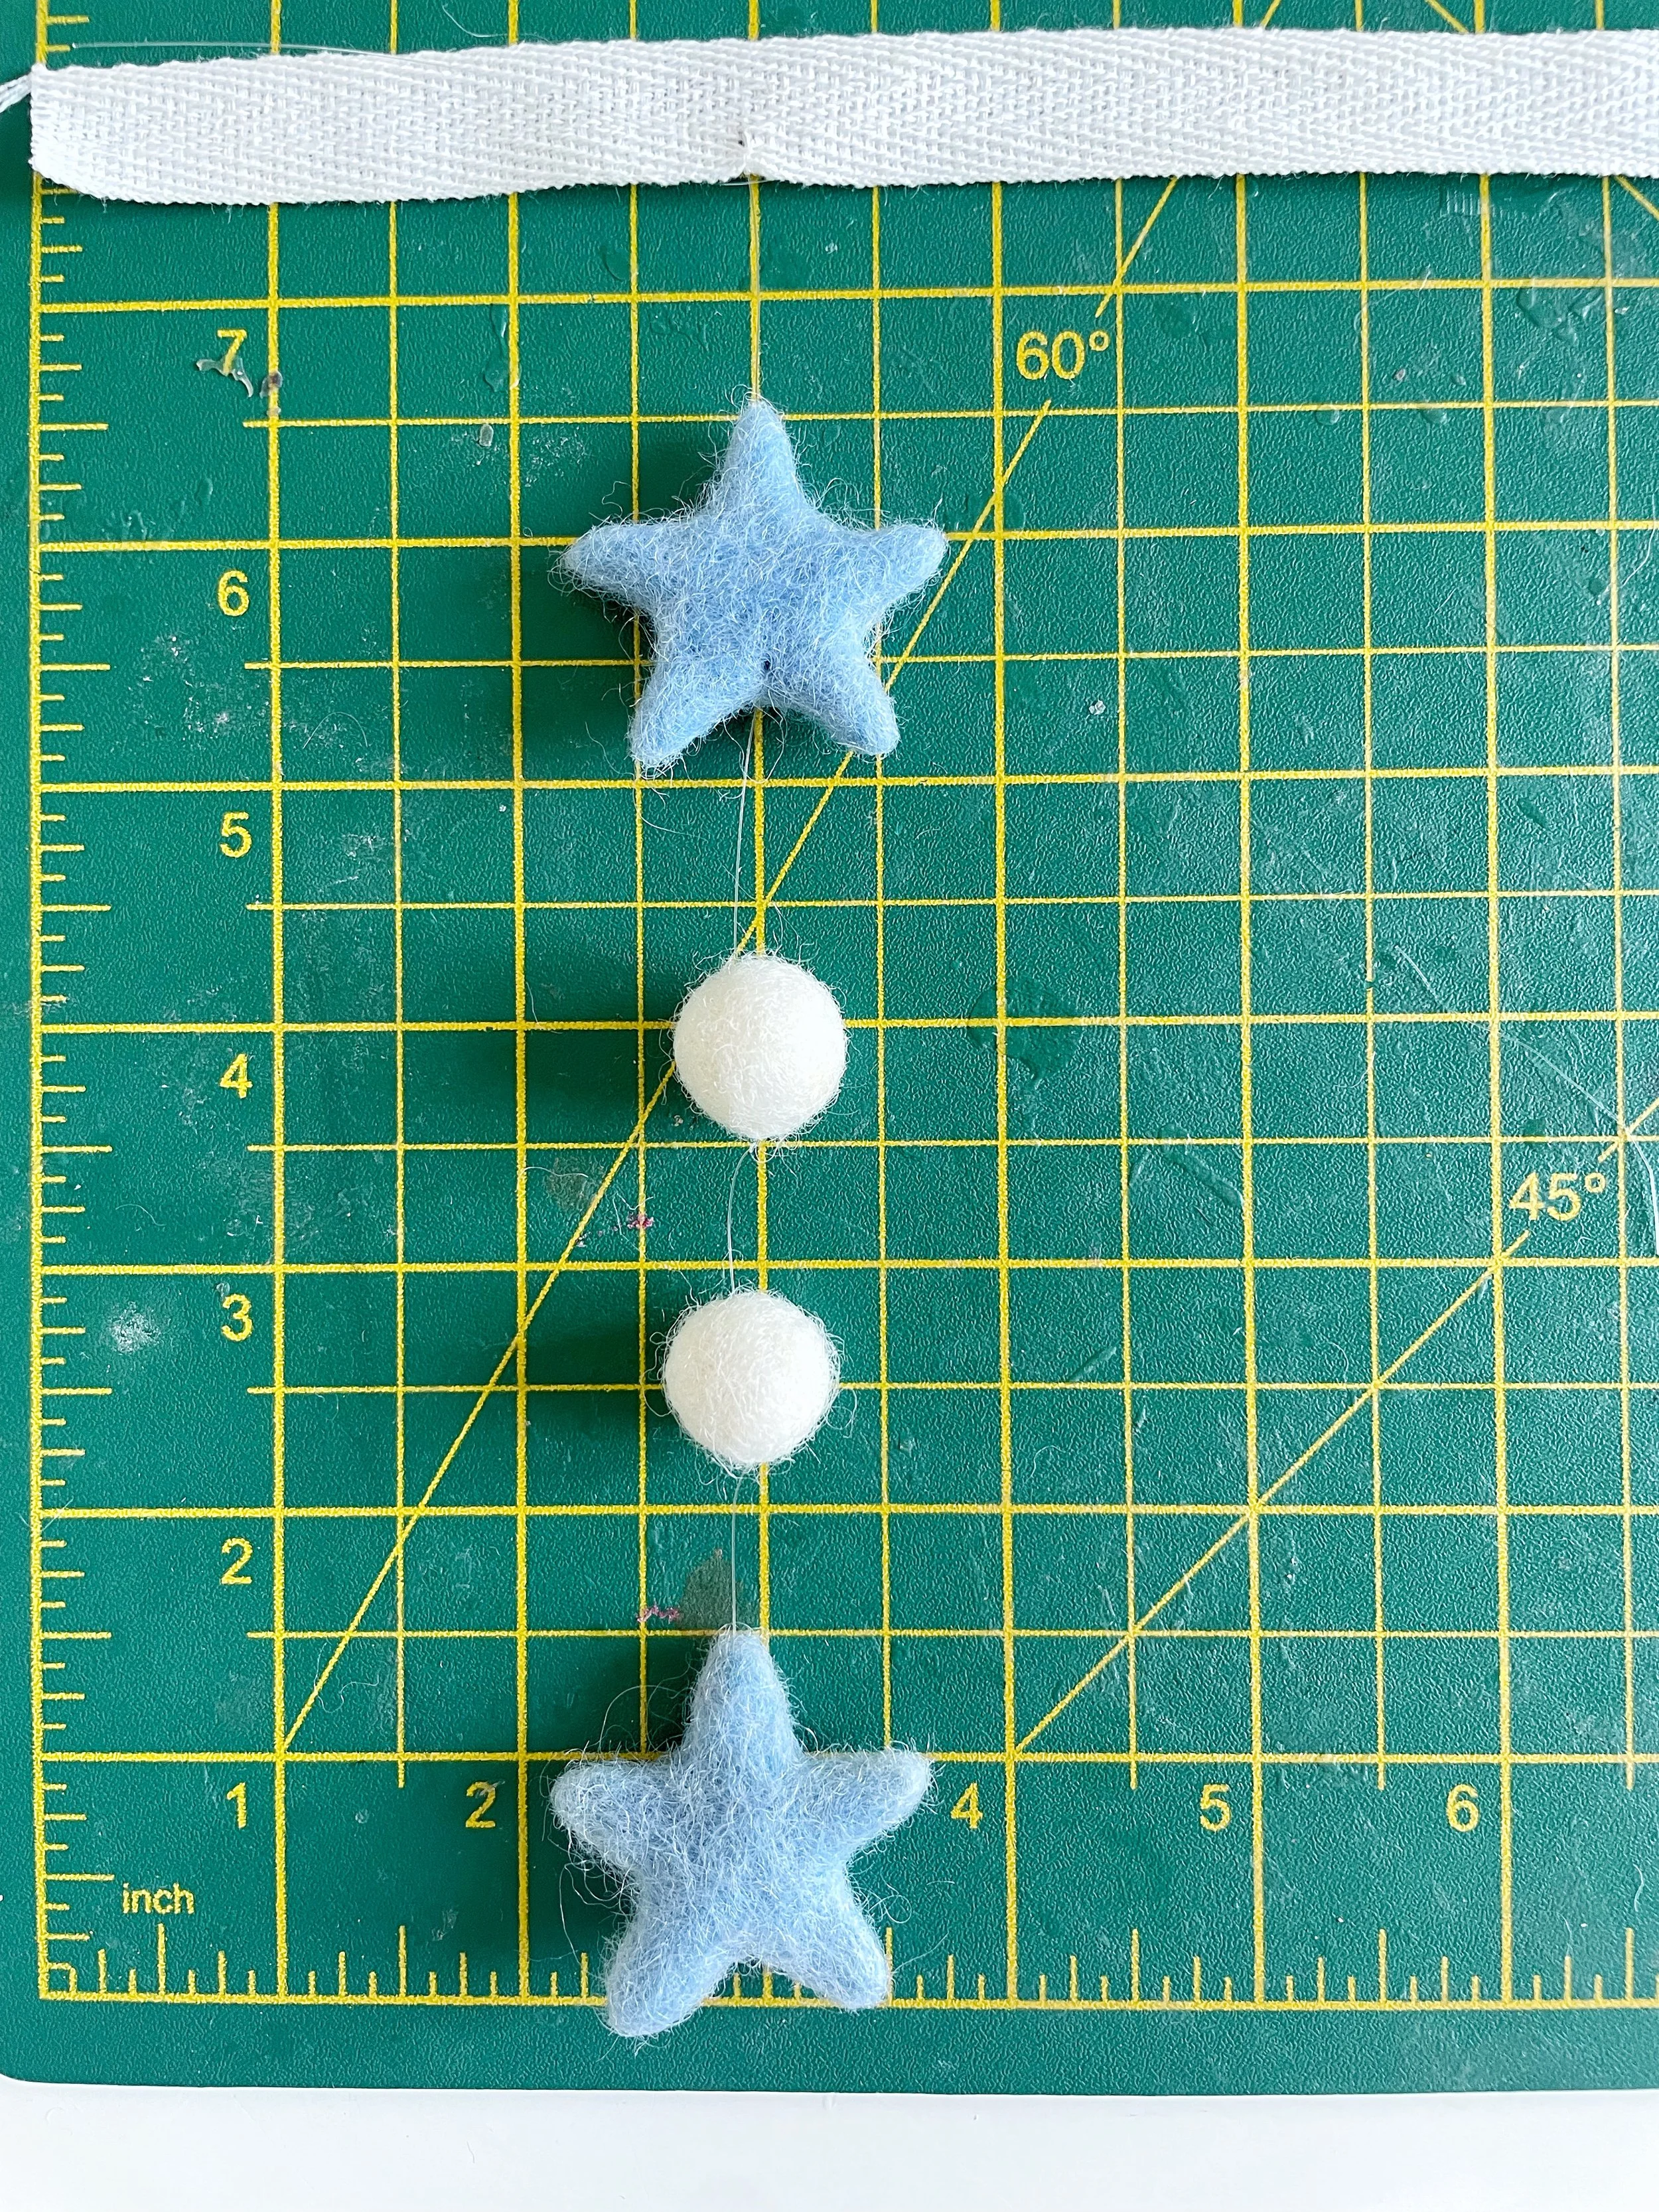
Start by cutting a length of invisible thread (or cotton thread if you prefer). I always like to add a few extra inches, at least 5 or so, because it’s much easier to trim away the excess later than to find yourself short while you’re working.
Tie a small knot at the end of your thread. Then, using your needle, sew it securely into the bottom of the bias binding. Make sure it feels nice and firm so your strand stays in place.
✨ Little tip: I like to count the tiny holes in the binding as I sew the thread, so I can attach each strand at roughly the same point. Don’t stress about getting it perfect, just keeping things fairly even will make the whole lampshade look neat and balanced.
If you take a peek at the photo above, you’ll see how I used the measurement lines on my cutting mat to help with spacing. It’s a really handy trick for keeping everything lined up and looking lovely.
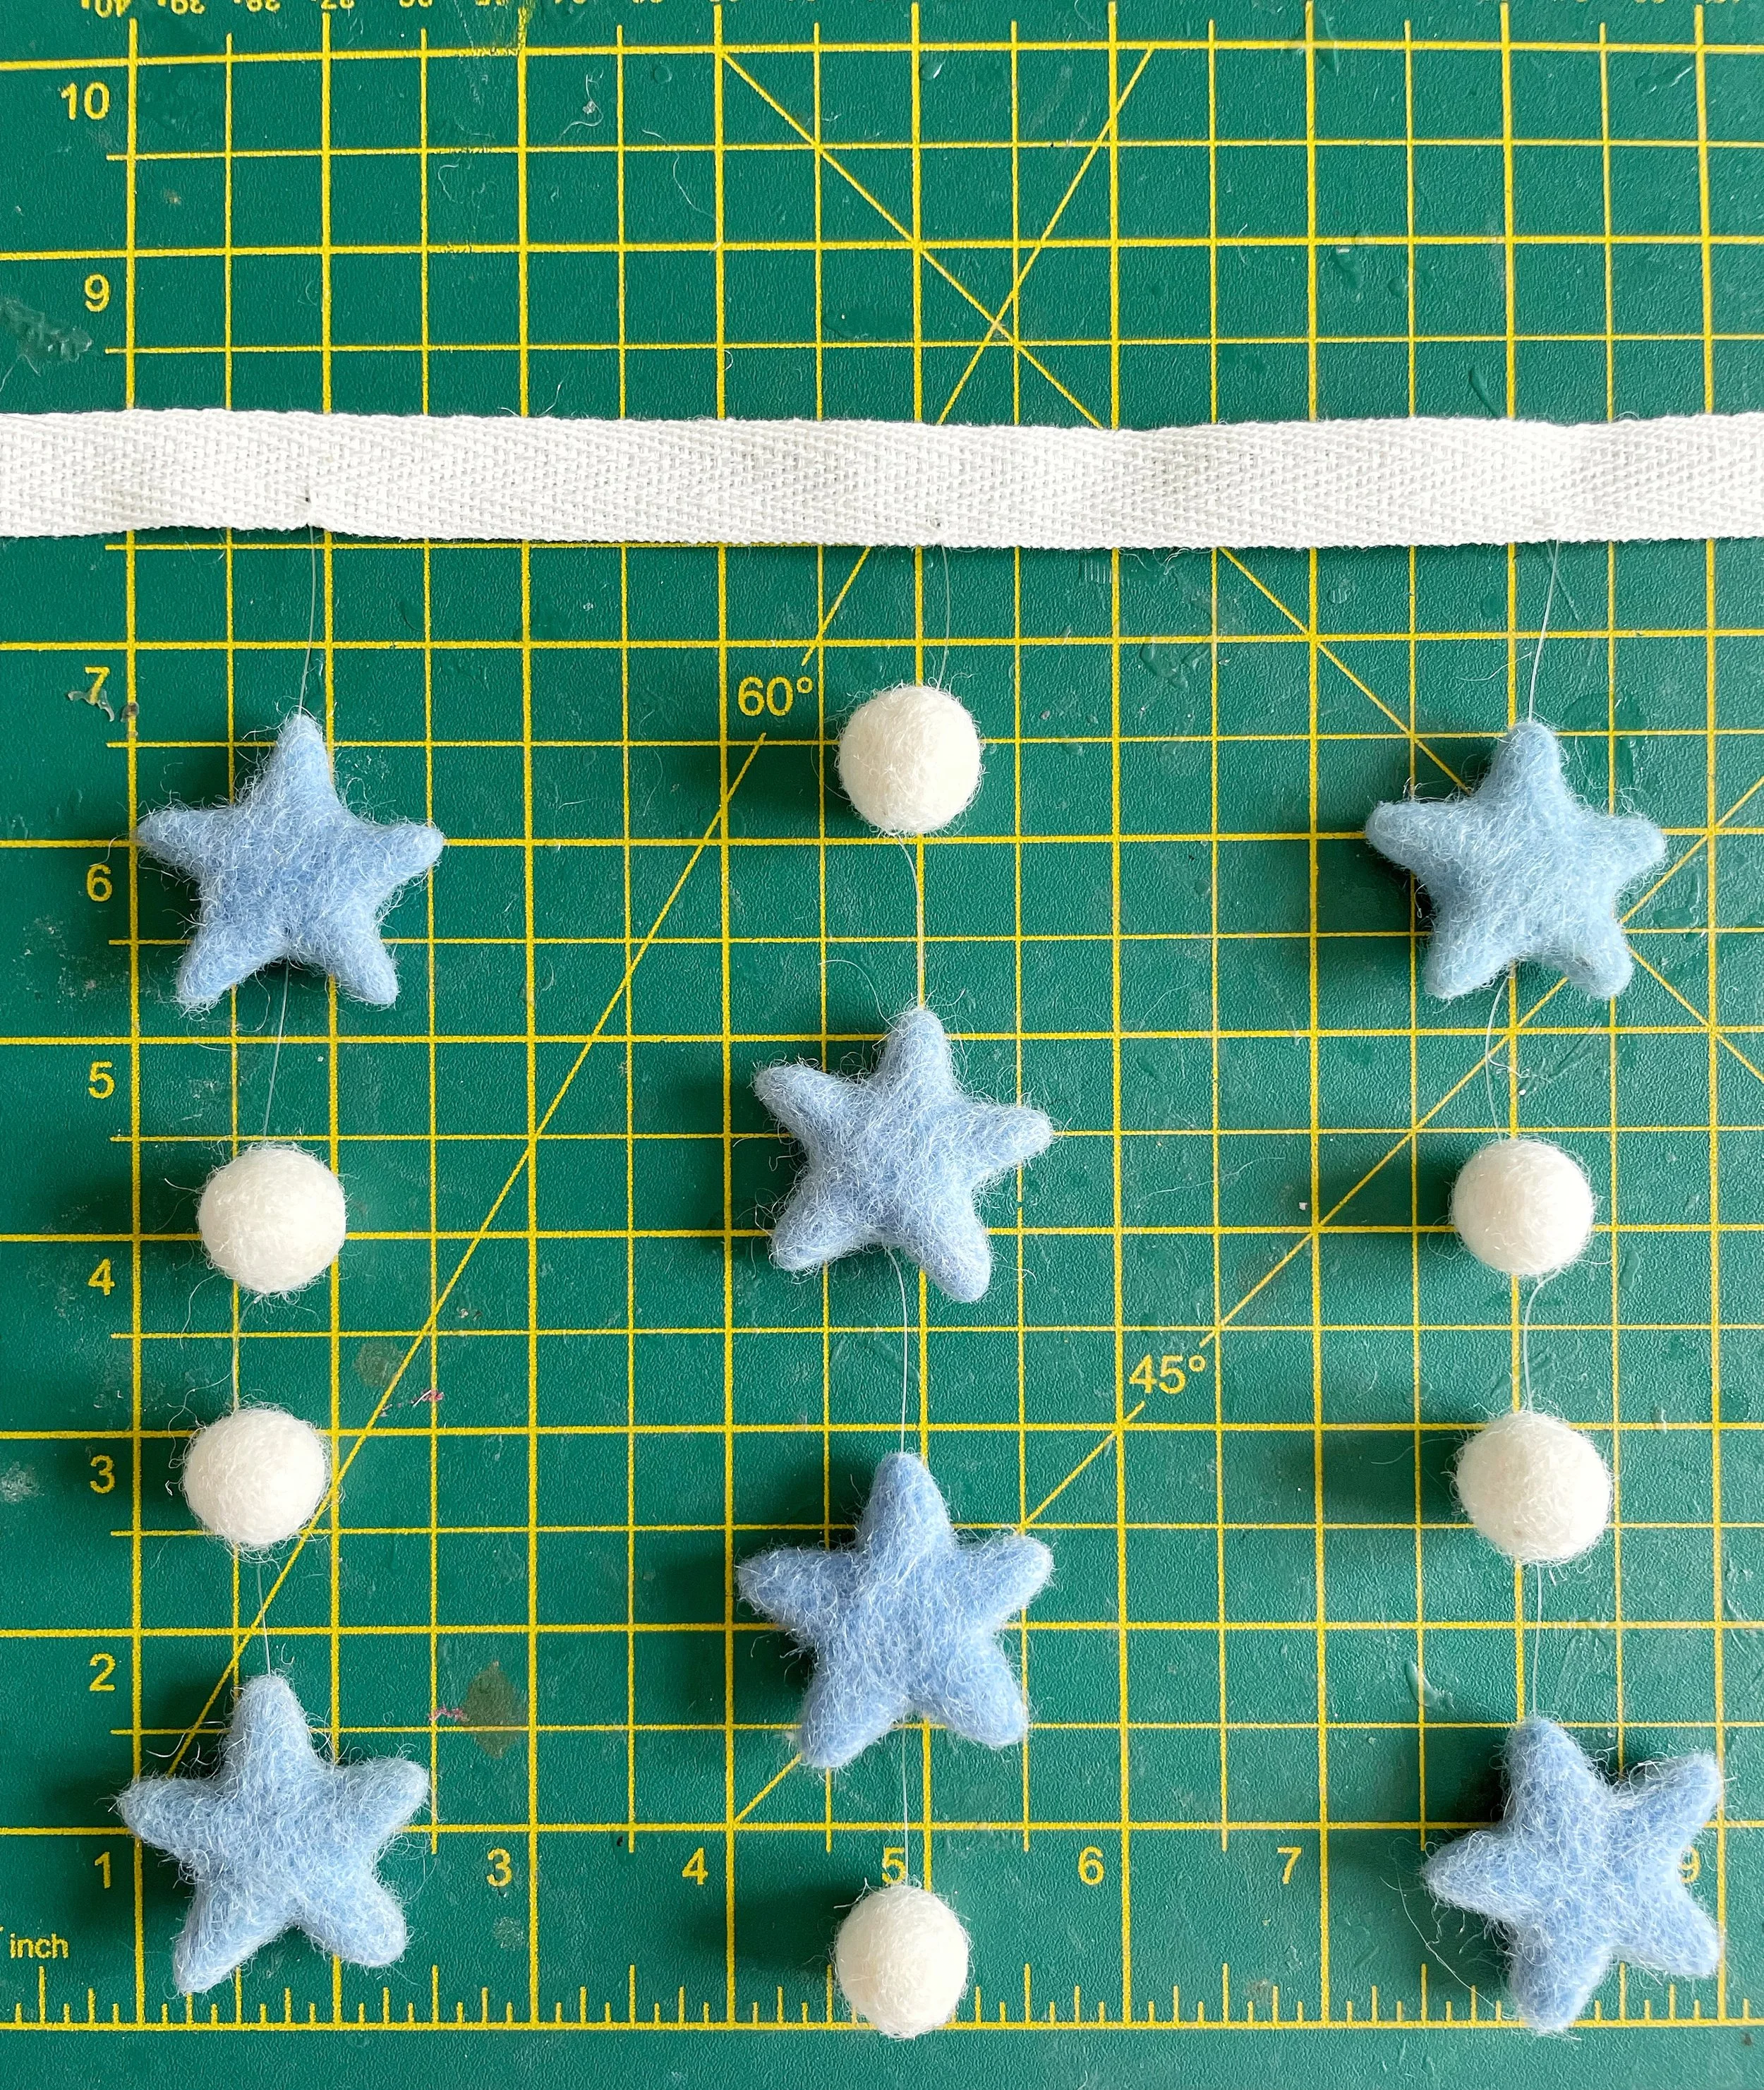
I started each strand by placing the first felt ball or star at about the 2.5 inch mark, then added the rest with a 1 inch gap between each one.
When you look closely at my strands, you’ll see I never put two stars right next to each other on the top or bottom of neighbouring strands. Instead, I stagger them so they’re nestled between the felt balls, it gives everything a lovely, balanced look.
But that’s just the way I like it!, The beauty of this project is that you can arrange your stars and felt balls however you like.
This is your creation, so play around until it feels just right for you.
To add each star or felt ball, simply use your needle to thread it onto the cotton strand. As you go, secure every felt ball or star in place by sewing a small knot at the base before moving on to the next one.
This keeps everything neatly spaced and stops them from sliding around.
And most importantly, it makes sure your beautiful star lampshade is nice and safe, especially if it’s going to hang in a little one’s room.
Test run your completed binding before glueing…
Before you reach for the glue, it’s a good idea to do a quick check to make sure everything looks just right.
Take your completed binding with all the stars and felt balls attached, and lightly stick it inside the lampshade base using a bit of masking tape. This way you can step back and see how it all hangs.
Sometimes you might notice a little gap or feel that it would look even better with an extra strand or two, this is the perfect time to add them in before committing with glue.
It’s a small step, but it makes all the difference in ensuring your lampshade has that lovely, full, balanced look.
Glue the binding to the lampshade…
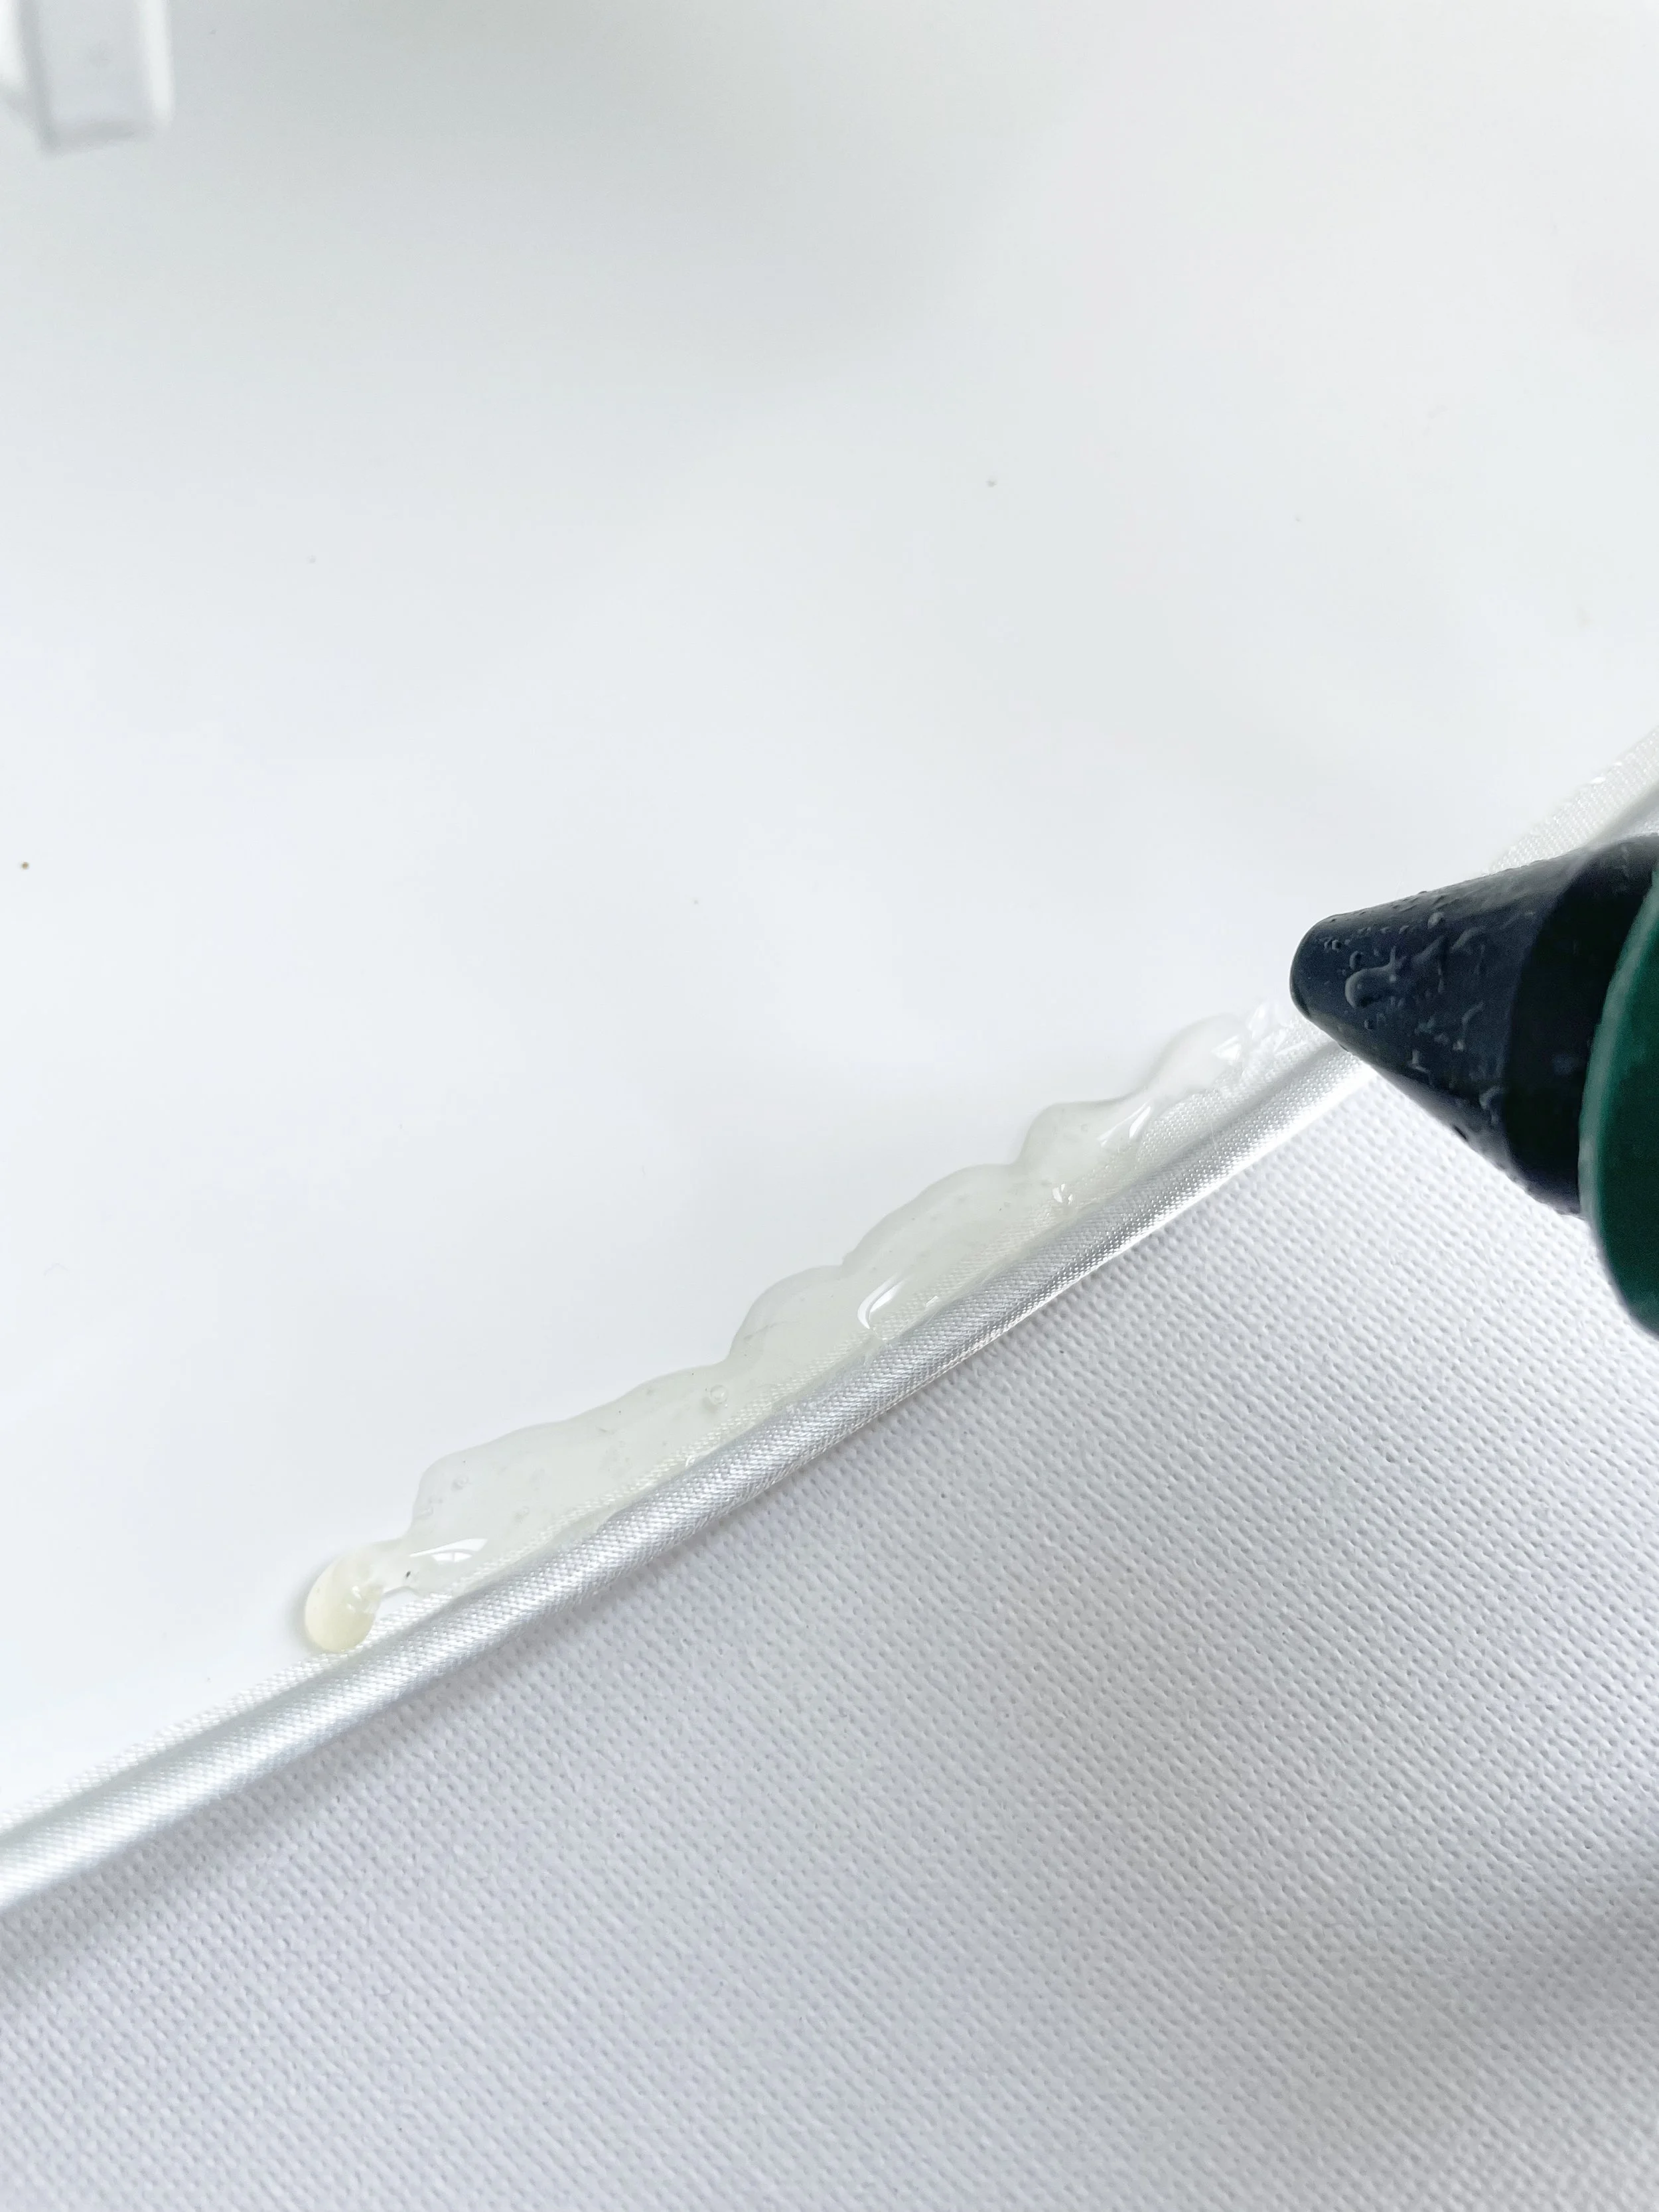
Now it’s time to glue the binding to your lampshade. If you’re using a glue gun, switch it on so it has time to heat up.
Once it’s ready, begin by adding a couple of inches of glue just above the rim on the inside base of your lampshade (see the picture above).
✨ Go slowly here, work in small sections of about 2 inches at a time. If you try to rush, you might find your threads get caught in the glue, and it’s much easier to keep things neat when you take it step by step.
As you glue the binding in place, double-check that the threads are sitting on the outside surface of the binding, not on the side you’re gluing down. This ensures your stars and felt balls hang freely and don’t get stuck.
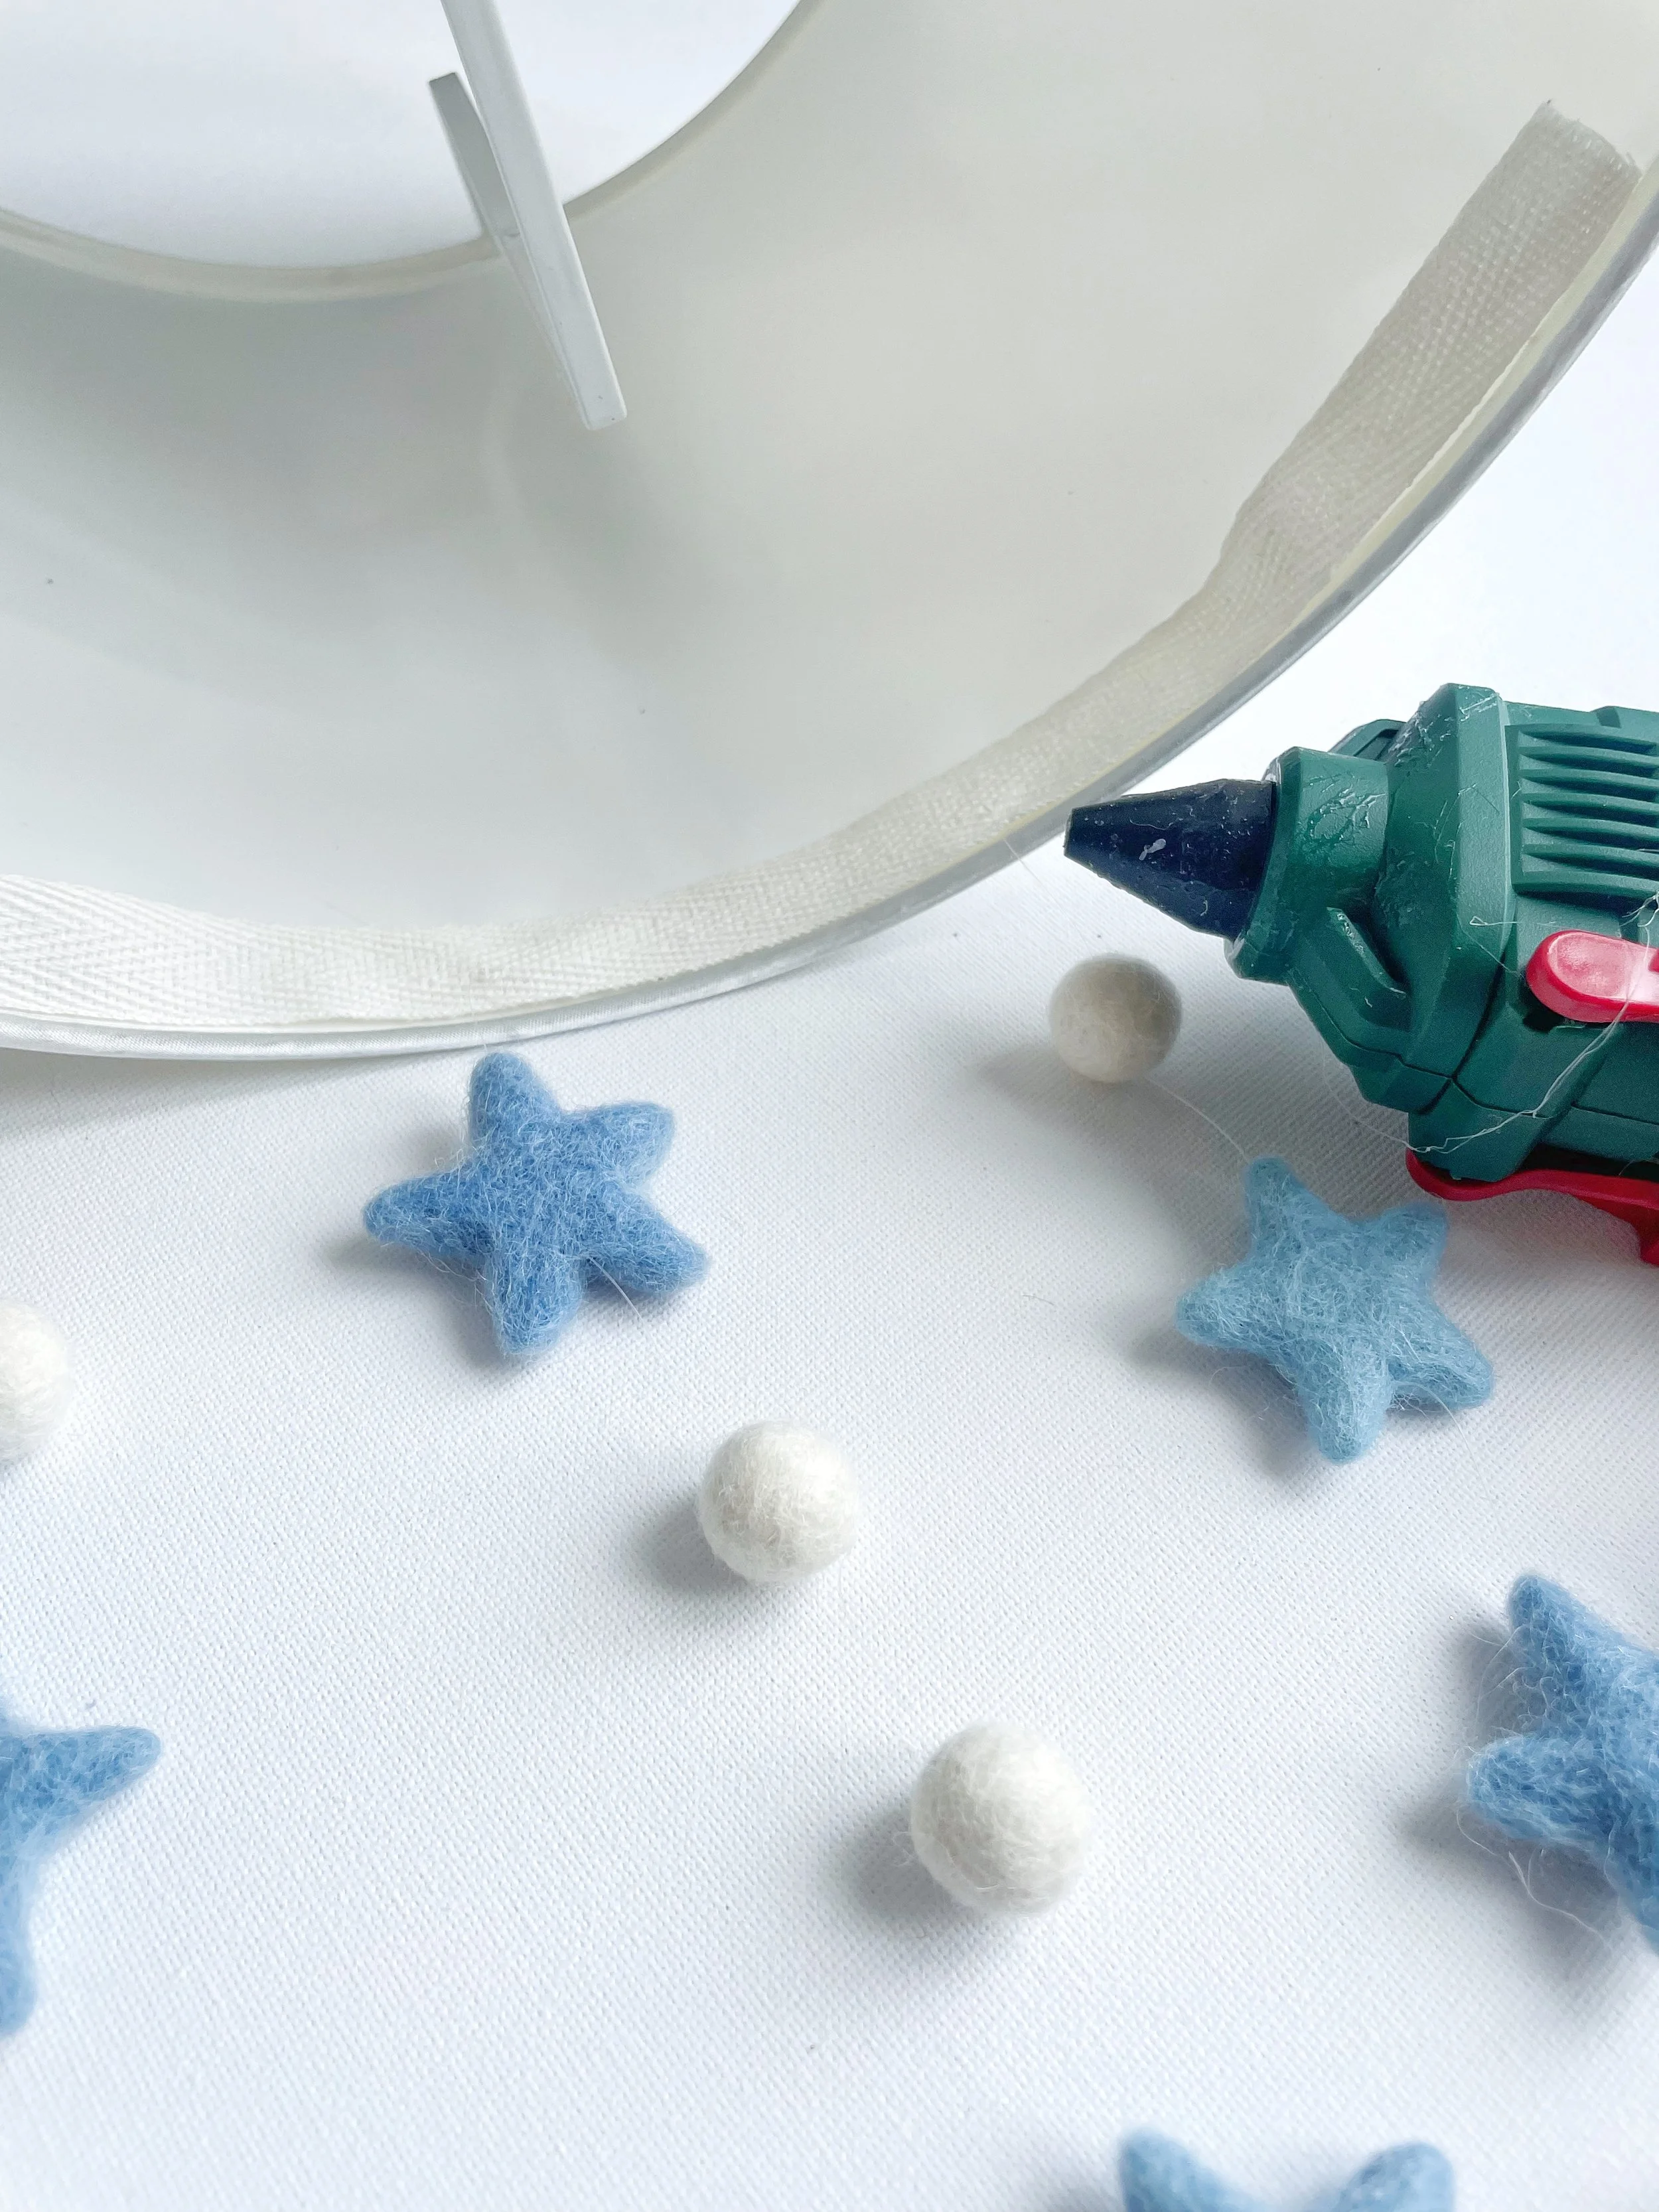
Work your way slowly around the lampshade, adding a few inches of glue at a time and gently pressing the binding into place. Give it a couple of seconds to set before moving on, this helps everything stay neat and secure.
Keep going until you’ve made it all the way around. Once the binding is fully glued down, your beautiful hanging star lampshade is complete!
Now all that’s left is to hang it up and enjoy the dreamy, calming effect of those gently swaying stars and felt balls.
And there you have it, your very own hanging star lampshade!
I hope you enjoyed making this sweet little project as much as I enjoyed creating the tutorial for you. If you’ve caught the crafting bug, don’t forget to check out my felt ball garland tutorial, it’s the perfect matching piece to complete your starry night theme.
I’d absolutely love to see how your star lampshade turned out! If you have any questions, tips, or just want to share your finished creation, pop a comment below, it always makes my day to hear from you.
Sending love and a sprinkle of creativity,
Karen x